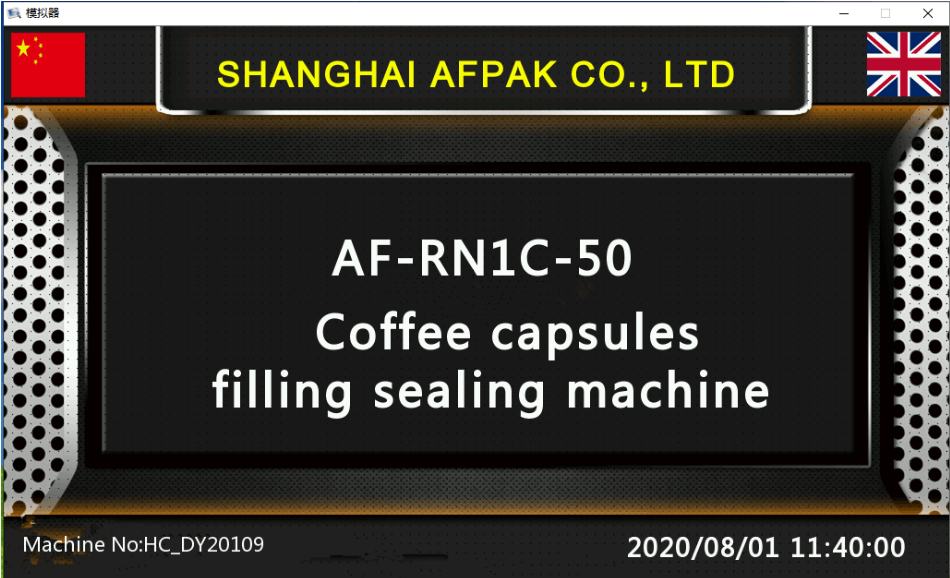
ロータリーRN1Sコーヒーカプセル充填シーリングマシン
操作およびメンテナンスマニュアル
*このマニュアルは、ネスプレッソ、Kカップ、ラバッツァ、ドルチェグストなどを生産していても、すべてのRN1Sコーヒーカプセル充填シーリングマシンに使用できます。これらはすべてこのマシンに従うことができます。ありがとう
目次
(このページから、次の内容が表示され、詳細な説明にジャンプするために必要なコンテンツをクリックできます)
2.5コンピューター画面のレイアウトとキー機能を制御します。 8
1はじめに
1.1目的
マシンを設置する前に、人身傷害を避けたり、機械に損傷を与えないように、このマニュアルを注意深く読んでください。
操作を試みる前に、機械、接続、緊急停止手順に慣れてください。
1.2オーディエンス
このマニュアルは、マシンの基本的な操作とプログラミングのトレーニングを支援することを目的としています。機械の運用は、技術監督の下で訓練を受けたスタッフがのみ試みる必要があります。
1.3パッケージマシンは危険です。
パッケージング操作には、移動するアームとレバレッジポイント、高電圧、高圧ガスが必要です。これらはすべて深刻な害を引き起こす可能性があります。
- 機械を操作するすべての人員が正しく訓練され、このマニュアルの安全規則を遵守することが不可欠です。
- これは危険であり、オペレーターに深刻な害を引き起こす可能性があるため、セーフティガードを取り外したり、ドアアラームをオフにしたりしないでください。
- オペレーターは、仕事を遂行するために身体的および知的に適している必要があります。彼らは機械へのアプローチを許可されている唯一の人であり、彼らは事前に固定されたタスクのみを実行することを強いられており、彼らは正式に訓練されています。
- 許可された技術スタッフのみがマシンのメンテナンスを実行できます。
- 不正な担当者は、動作中に機械をきれいにすることは許可されていません。
- 動作中は機械を放置しないでください。
- 資格のある人のみが機械を操作、維持、修理する必要があります
- 故障が発生し、すぐに修理する場合は、マシンの使用を停止します。
- 電気ボードのドアは常に閉じている必要があります。
- マシンが機能している間、珍しいノイズに注意してください。異常なことが聞こえたら、マシンを停止してすぐに調査してください。
1.4セキュリティドア
安全上の理由から、マシンが稼働しているときにドアを開けないでください。マシンへのアクセスドアに近接スイッチがあります。ドアが開いていると、マシンを自動的に停止し、アラームを鳴らし、ストロボライトフラッシュを開始します。
注意安全上の危険:経験豊富なオペレーターとメンテナンススタッフの場合、ドアを開けてマシンを実行する必要がある場合があります。この場合、タッチスクリーンから安全ドア機能を無効にすることができます。
1.5緊急停止
In an emergency, you can press the red "stop" button on the machine, the machine will stop running immediately. After troubleshooting, then you can reset the button. Turn it right to reset.[/vc_column_text][/vc_column][/vc_row][vc_row][vc_column][vc_column_text]
2システムの説明
2.1重要な機能
ロータリーRN1Sコーヒーカプセル充填およびシーリングマシンは、1分あたり最大70カプセルを動作できる完全に密閉された自動カプセル充填機です。
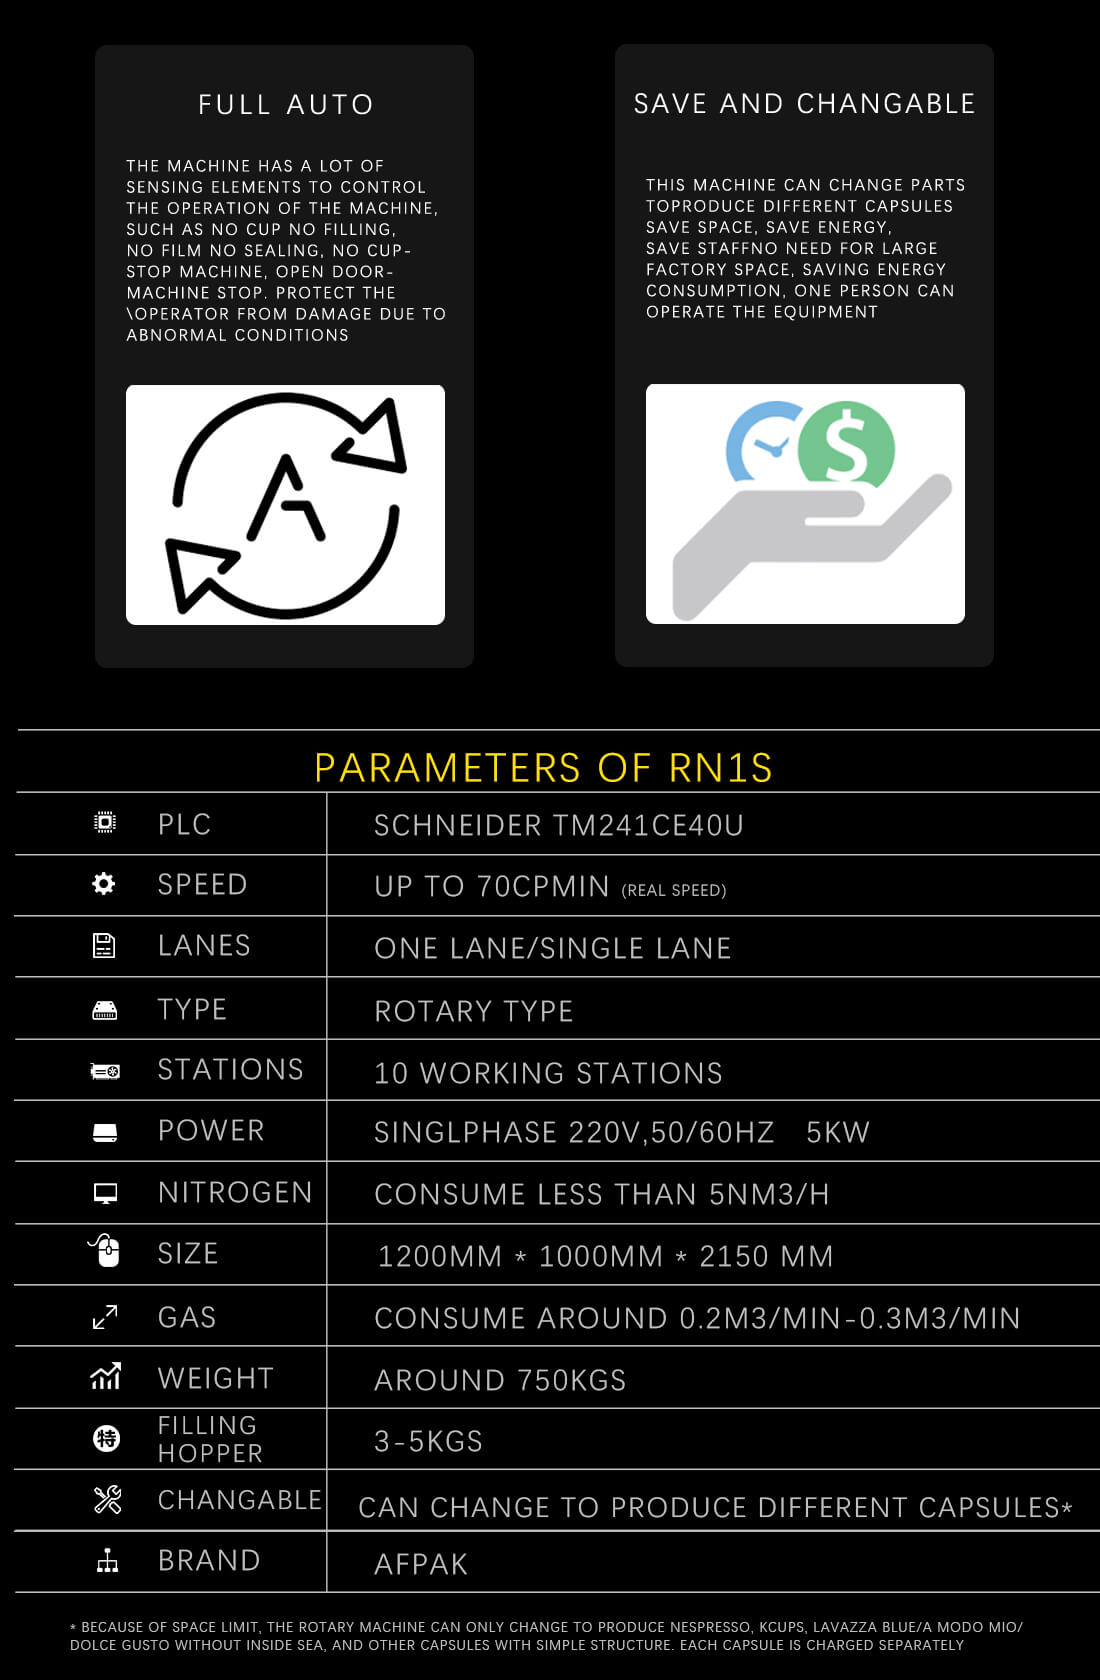
図1-仕様
2.2操作環境
このマシンは、屋内環境で室温で動作するように設計されています。
マシンにはキャスターが取り付けられているため、平らな表面で移動できます。移動する前に、すべての接続と安全なスイングアームを削除してください。
マシンが動作している場合、熱帯デバイスの温度は非常に高くなります。マシンを調整する必要がある場合、または加熱要素の近くにあるメンテナンス機能を実行する必要がある場合は、マシンをオフにして、最初に冷却してください。
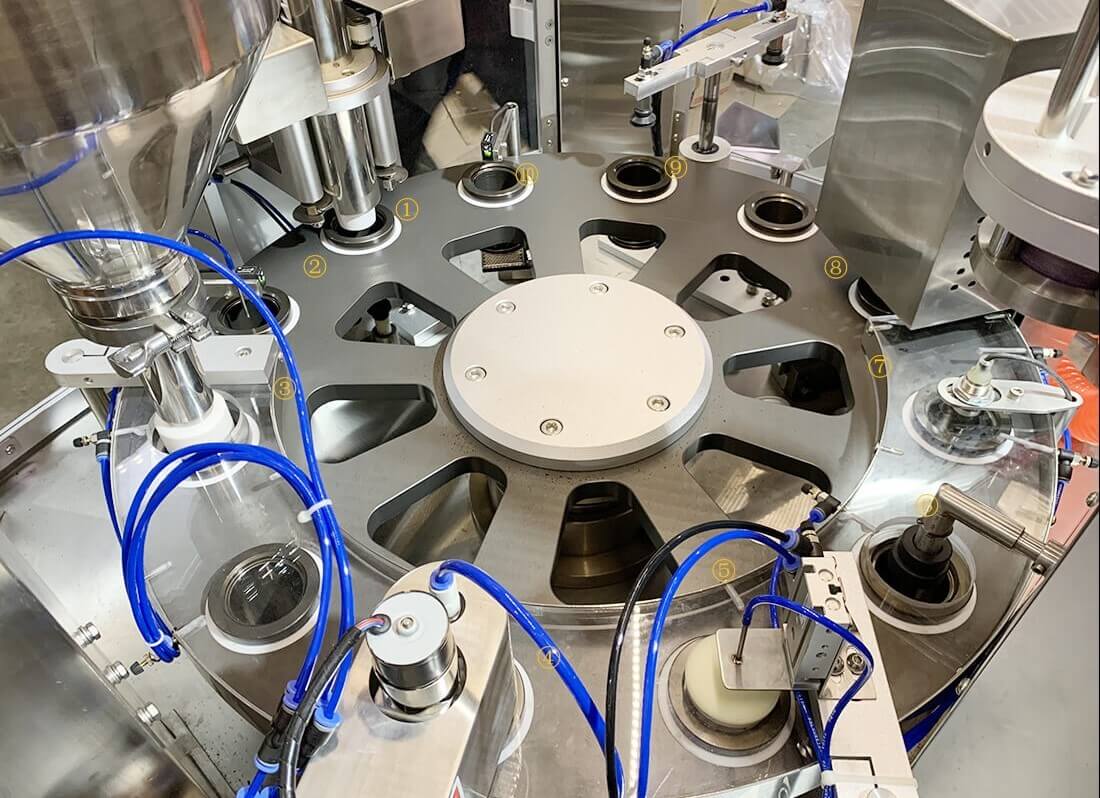
2.3マシンの概要
マシンを設置する前に、人身傷害を避けたり、機械に損傷を与えないように、このマニュアルを注意深く読んでください。
操作を試みる前に、機械、接続、緊急停止手順に慣れてください。
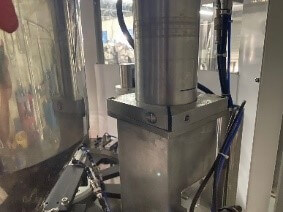
- 垂直カプセルドロッパー
- カップセンサー、カップホルダーが空の場合、マシンはそのスロットを埋めません。
- サーボ制御オーガーによるグランドコーヒーフィラー。
- エッジクリーニング。
- 窒素充填チューブ(図の青いチューブ)
- 紙のふたをカットして置きます。
- 蓋センサー。
- 蓋シーリング
- カプセル出力
- カプセルセンサー、通常、ふたが正しく配置されていない場合、カプセルは持ち上げ腕によって持ち上げられません。コーヒーカプセル充填シーリングマシンが停止します。
2.4マシンパスコード
警告:ユーザーのみがプログラミングモードに入る必要があります。
2.5コンピューター画面のレイアウトとキー機能を制御します

すべての重要な関数は、コントロールパネルを介して制御されます。ほとんどの要素は工場から事前にプログラムされます。工場出荷時のデフォルト設定を記録する前に、設定を変更しないでください。
- メインタッチスクリーン
- 手動操作
- 自動操作
- 停止
- 緊急停止
- セカンドヒートシール
各関数を制御することは非常に簡単で、2つの操作モードがあります。自動およびマニュアル。ほとんどの場合、マシンは自動モードで動作します。
プレス 自動 コントロールパネルで押します 自動 ボタンC - 開始。
マシンは、すべての機能に対して自動的に動作します。
特定の関数を制御する場合は、マシンを手動モードのままにして、コントロールパネルの目的の関数を選択してから、自動ボタンcを押して開始します。[/vc_column_text] [/vc_column] [/vc_row]
3インストールとコーヒーカプセル充填シーリングマシンの操作の準備
次の手順に従ってください。
3.1電源 - 240ボルト50 Hz
供給された電源ケーブルを240 V 50 Hz 10アンペアコンセントに接続します。
電源ケーブルを接続した後。オン/オフスイッチを使用してマシンをオンにします。
3.2温度を設定します
2つのシーリングユニットの温度は、コントロールパネルの2つの制御メーターによって設定されます。トップメーター(メーターG)は、カッターと最初のシーリングユニットの温度を設定します。
ボトムメーター(メーターF)は、2番目のシーリングユニットの温度を設定します。
温度を設定するには、希望の温度に達するまでアップ /ダウンボタンを押します。この値は緑色で表示されます。
ユニットが加熱され、実際の温度が表示されます。両方の温度ゲージの実際の温度に達すると、カプセルの作成を開始できます。
3.3圧縮空気 - ブルーレギュレーター
必要に応じて、提供された接続または新しいコネクタを使用して、圧縮空気を次のインレットに接続します。
B-オン/オフスイッチ、プッシュインして空気供給を切り替え、引き出して空気供給を回します。
空気圧を調整するには、メーターCに示すように、0.6 bar-0.8 barのユニットに空気圧を供給するためにAを引き出します。
調整後、Cがロックされた位置に押し戻されることを確認してください。

3.4窒素 - 赤いレギュレーター
コーヒーは繊細な製品です。ポーションパックでのコーヒーの酸化を防ぐために、カプセルが密閉され、酸素が除去されるまで、投与中に窒素ガスが使用されます。
窒素フラッシングは、カプセルパッキングマシンによって自動的に処理されます。唯一の要件は、食品グレードの窒素のボトルを機械に接続することです。
空気圧を調整するには、メーターEに示すように、Dを0.1 MPaのユニットに空気圧を供給するために、Dを引き出します。
窒素ガスの圧力は0.1MPaでなければなりませんが、流量は200〜500リットル/分を推奨します。
食品グレードの窒素を使用します。
3.5荷重カプセル
カプセルチューブに空のカプセルを積み込みます。
3.6ロードペーパーReal
以下の手順に従って、紙を実際にロードします。
3.7投与量のプログラミング
Set the desired weight of the capsule, in this example we will is 5.5g. To calibrate this weight, you will then need to adjust the FEEDING SUBDIVISION values. The Larger the value, the lower filling quantity, the smaller value, the greater filling quantity. A good starting point is 1.34.
| 関数 | 説明 |
| Filling Serve Turn on 100 Shut 200 - this is to control the filling servo on and off time | NO NEED TO ADJUST THIS VALUE – FACTORY SET |
| Topping device Turn on Shut 300 – This is the capsules lift and down time. | NO NEED TO ADJUST THIS VALUE – FACTORY SET |
| Stirring time 1.0 s This is the delay time to the next stirring cycle when stirring is not set to continuous mode. | NO NEED TO ADJUST THIS VALUE – FACTORY SET |
| Cup testing to topping 0 - no cup no filling | NO NEED TO ADJUST THIS VALUE – FACTORY SET |
| Weight added 5.5 g – You can set this value to the filling weight you want to get | Adjust this value for the desired output weight |
| Filling Serve Turn on 100 Shut 200 -this is to control the filling servo on and off time from Programmer value | NO NEED TO ADJUST THIS VALUE – FACTORY SET |
| Feeding Subdivision: This is to adjust the filling accuracy, if the measured weight does not meet the set value (Weight added 5.5 g), you can calibrate with this value. Adjust the feeding subdivision: The Larger the value, the lower filling quantity, The smaller value, the greater filling quantity | Adjust this value to calibrate. A good starting point is 1.34 |
| SERVO speed No need to change normally, this is the servo motor running speed. | NO NEED TO ADJUST THIS VALUE – FACTORY SET |
| SERVO Acceleration. This is to adjust the servo motor acceleration, The lower the value the faster the speed. | NO NEED TO ADJUST THIS VALUE – FACTORY SET |
| Servo Deceleration: To adjust the servo motor stop, the larger the value the longer it will take to stop. | NO NEED TO ADJUST THIS VALUE – FACTORY SET |
| SERVO. This is the servo motor running speed. | NO NEED TO ADJUST THIS VALUE – FACTORY SET |
| Filling times after less material | NO NEED TO ADJUST THIS VALUE – FACTORY SET |
Figure 8 - programming of dosage
3.8 Setting the cup capsule counter
You can program the machine to set up a predefined number of capsules. Once the machine reaches the programmed amount of capsules the machine will automatically stop and an alarm with sound.
To set the programmed quantity:
選択 COUNTING STOP and enter desired number of capsules
Activate CUPCOUNT
Machine will automatically stop after the programmed amount of cups
3.9 Counting the number of capsules at the end of the conveyor belt
You can program the machine to set up a predefined number of capsules at the end of the conveyor belt before the chute changes position.
Once the machine reaches the programmed number of capsules the chute will change positions. This allows the counting of capsules per carton before packing.
To set the programmed quantity.
4 Loading the ground coffee
4.1 About the Ground Coffee loader.
The ground coffee loader will automatically load the auger with ground coffee.
Please check the connections prior to operating.
- Air Supply
- Electrical line connection
- Tube for ground coffee

4.2 Loading and Unloading the Ground Coffee
- Clean the Filter.
- Switch Machine to “AUTOMATIC”
- Press the ON/OFF button on the vacuum feeder box to keep the vacuum feeder ON. NOTE: This needs to be done every time you turn on the machine. The filler will work automatically as the hopper needs filling.
- After turning ON the feeder, there is a sensor on the filling hopper to check and control the vacuum feeder/conveyor.

4.3 Emptying the Ground Coffee Hopper
Please do not leave ground coffee in the hopper. It should be packed in capsules or removed once you have finished packing for the day.
To empty the Hopper and the auger please follow the instructions below.
- Loosen the screw below the Auger.
- On control panel, Switch to MANUAL
- 選択 FILLING と STIR on the touchscreen
- Use buttons to lift the Auger, swing out and empty coffee.
- Once you have aligned the hopper away from the machine and have a container under the spout,
- Turn off FILLING
- Active the EMPTY HOPPER と STIR
- Once the AUGUR is empty – Turn off EMPTY HOPPER と STIR
- To reverse the process and put the machine back to normal operational mode.
- Use button to move Augur down.
- Tighten the screw to lock into position.
5 OPERATING the MACHINE
5.1 Language selection
Figure 15 - Language select
Press (hold 3 seconds) the Chinese flag, change to Chinese language on the control panel.
Press (hold 3 seconds) the U.K. flag, change to English language on the control panel.
5.2 Operating the machine in automatic mode
マシンは通常、オペレータがパラメータを調整する必要なく、AUTOMATIC モードで動作します。
- マシンを始動する前に、マシンがすべてのカプセルから離れていることが重要です。
- Turn on machine and wait until it reaches temperature on the front Control Panels
- 空気圧が正しいことを確認してください。
- 窒素注入を開きます。
- 真空フィーダーをオンにします
- 挽いたコーヒーを入れる
- 空のカプセルをカプセルホッパーに入れる
- マシンを 自動モード
- コントロール パネルの緑色のボタン「C」AUTOMATIC を押します。
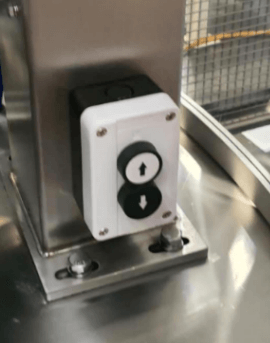
- 赤いボタン「D」を押すと、いつでもマシンを停止できます。
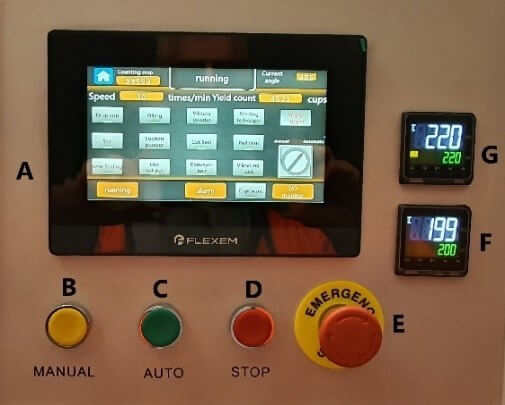
Figure 16 - Control buttons on panel

Figure 17 - Main machine synoptic
5.3 Operating functions manually
It is possible to operate individual or multiple elements manually for the purposes of testing or cleaning.
Select a function from the control panel.
- Example select CONVEYER BELT
- Press the GREEN ‘C’ Button AUTOMATIC on the control panel to start
- Press the RED ‘D’ Button to stop the machine at any time.
- Example select PULL FILM
- Press the GREEN ‘C’ Button AUTOMATIC on the control panel to start
- Press the RED ‘D’ Button to stop the machine at any time.
6 Programming mode
6.1 MACHINE Synoptic
This is page to enter the parameters settings. Do not make any changes without conforming with the manufacturer. The passcode is 198888.
6.2 Auto running page
This is page to enter the parameters settings. Do not make any changes without conforming with the manufacturer. The passcode is 198888.

Figure 18 - Machine Synoptic
The machine Synoptic chart shows the main operational elements of the machine. When the machine is in MANUAL MODE, selecting one of the key functions will take you to the programming functions for that part of the process.
Key programming functions:
- DROP CUP
- FILLING
- SUCTION POWDER
- CUT SEAL
- HEAT SEALING
- CUP OUTPUT - parameters set to protect the cylinder when machine is stop
- Heating - is to turn on the heating No. 5 and No.6. Press to turn ON/OFF
- Current angle: the rotary disc position now when running (set in the machine programmer)
- Stopping Position: the rotary disc running time (set in the machine programmer)
- Home page: press to back to home page
- Short cut to the running screen
- Short cut to the alarm screen
- Short cut to the I/O monitor screen
6.3 RUNNING
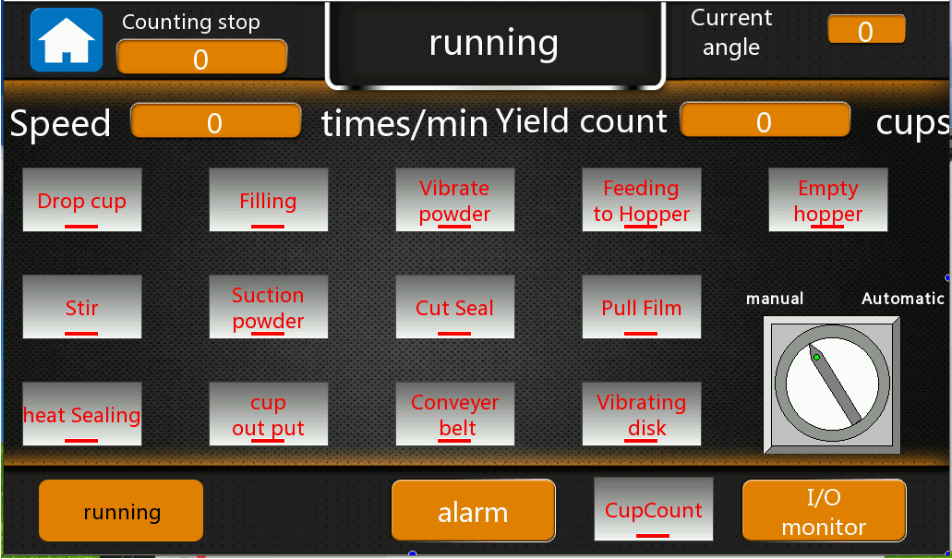
Figure 19 - Main running screen
This is the main screen that is used to operate the machine. Place the machine in Automatic and then press Button C (green button) to run the machine. Refer 8 Operating the machine.
- Drop cup: to control the drop cup
- Filling: to control the filling station
- Vibrate powder: to control the filling vibration
- Feeding to hopper: To control the vacuum feeder
- Empty Hopper: the function to clean the hopper
- Stir: to control the stir motor
- Suction powder: to control the capsules edge cleaning station
- Cut seal: to control the cut and seal station
- Pull film: to control the pull film motor
- Heat sealing: to control the second sealing station
- Cup output: to control the cup output
- Conveyor belt: control the belt running
- Vibrating disk: to control the vibrating capsules feeding system (optional function
- Cup count: to control the cup counting function
- Manual/Automatic: If Manual mode, all functions are not working, you need to press the one you want to working, then press the green button under the screen to test this function; If auto mode, all functions will work
6.4 DROP CUP
The drop cup programming screen is entered by touching on DROPPED CUP on the synopsis.
Manual operations include:
- Drop Cup. press to run this function in Manual module. only press the button, then the function will operate. In Auto module, all the functions will operate.
Programming functions.
- Yield count: to count how many capsules have been produced.
- Speed: the machine running speed.
- Manual/Automatic: switch to auto running or manual running of the machine.
- Drop Cylinder: set the parameters to control the drop cup cylinder when to work and stop
- Cup drop up/down: set the parameters to control the cup up/down cylinder when to work and stop
- Cup drop vacuum: set the parameters to control the drop cup vacuum suction when to work and stop
- Cup test: is the sensor parameters to detector when to work/stop
- Number of cups drops after cup absence: set to value to stop the machine after how many capsules absence in the rotary disc
- Instructions: is the function working signal
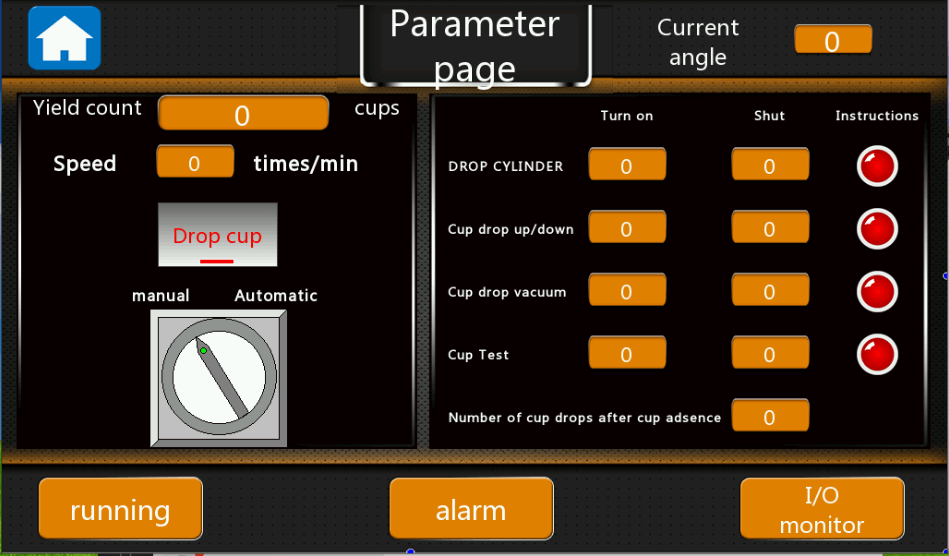
Figure 20 - Drop cup Parameter Page
6.5 FILLING
Enter the filling programming menu by selecting the filling indicator on the synoptic. This programming menu will allow you to adjust key ground coffee filling values for the machine. You should limit any changes in this programming screen as most values are factory set.
Typically, you will only need to adjust the Weight added field.
Calibration is done through the Feeding Subdivision field.
- Filling Servo.
- Topping device.
- Stirring time.
- Cup testing to topping.
- Weight added 5.5 g – You can set this value to the filling weight you want to obtain.
- Filling Serve.
- Feeding Subdivision. This is to adjust the filling accuracy, if the measured weight does not meet the set value (Weight added 5.5 g), you can calibrate with this value.
- SERVO speed.
- SERVO Acceleration. This is to adjust the servo motor acceleration, The lower the value the faster the speed.
- Servo Deceleration. To adjust the servo motor stop, the larger the value the longer it will take to stop.
- Filling times after less material.

Figure 21 - Capsule filling Parameter Page
6.6 VIBRATE POWDER
- Suction powder: to clean the powder on the capsules edge for better sealing
- Manual/automatic: in Manual module, only press the button, then the function will work. In Auto module, all the functions will work.
- Tamp Cylinder: to control when the tamp cylinder will work/ stop
- Vacuum suction: to control when the vacuum suction will work/ stop
- Powder detected to sucking: to set how many stations between the cup detector sensor to the suction powder station.
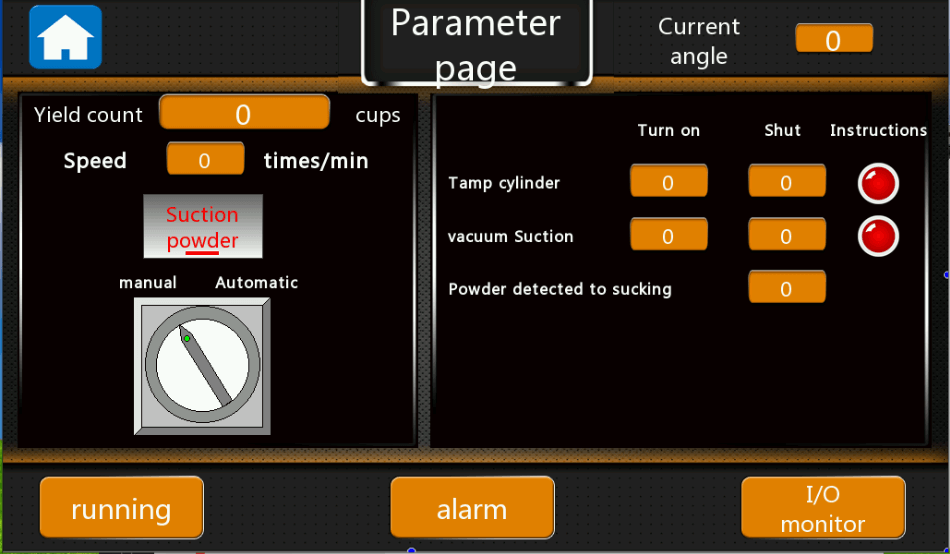
Figure 22 - Parameters page for suction powder
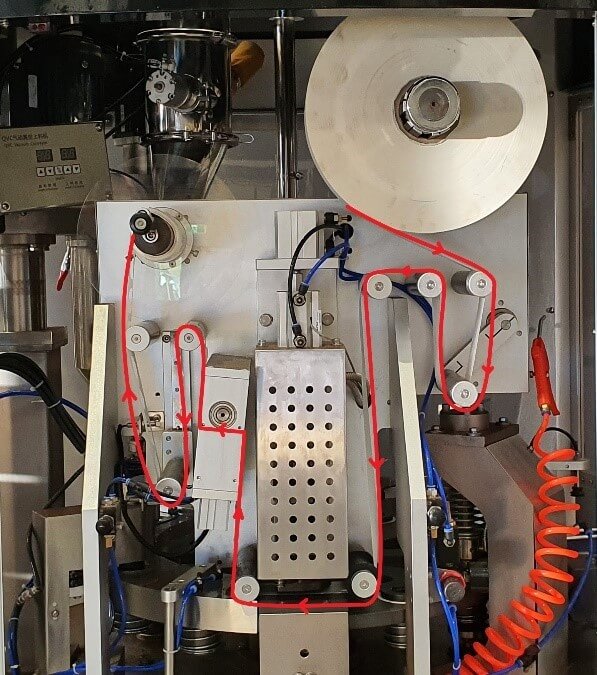
6.7 CUT SEAL
Enter the CUT SEAL programming menu by selecting the CUT SEAL indicator on the synoptic. This programming menu will allow you to adjust film real parameters for the machine. You should limit any changes in this programming screen as most values are factory set.
- Cut seal: to control the cut and seal cylinder.
- Put film: to control the pull film cylinder.
- Manual/auto: in Manual module, only press the button, then the function will work. In Auto module, all the functions will work.
- Manual punctuation: this is for the film with eye mark, press this button, and then the film will auto running and stop at the eye mark detected by the sensor.
- Calibration: is to control the machine to pull the film to the set length.
- Cutting cylinder: to control when the cutting cylinder work/stop,
- Film cutting heat seal: to control when the heat seal work/stop.
- Film drawing servo: to control when film pull servo work/stop.
- Cup test to cut the membrane: to set how many stations between the cup detector sensor to the film cutting station.
- Cup test to pull film: to set how many stations between the cup detector sensor to the pull film station.
- Pull speed: to control the film pull speed.
- Film accelerate: to control the servo motor when to accelerate to pull film more.
- Film Deceleration: to control the servo motor when to decelerate to pull film slowly.
- Film length I: to set the first step to pull how many films pull at one time.
- Film length II: to set the second step to pull how many films ay one time.
- Pull film compensation: to adjust the pull film accuracy.
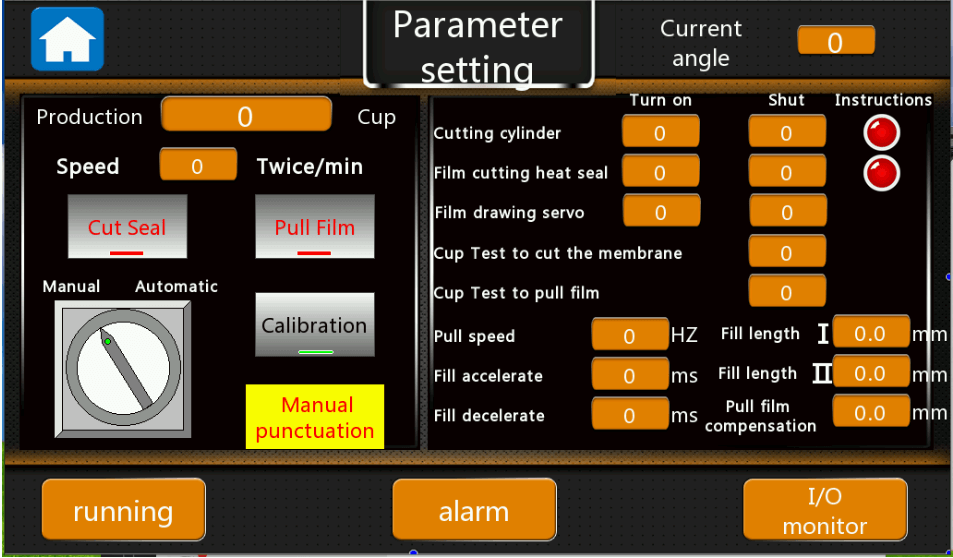
Figure 23 - Parameters page to seal and cut film
6.8 HEAT SEALING
Enter the HEAT SEALING programming menu by selecting the HEAT SEALING indicator on the synoptic. This programming menu will allow you to adjust the mechanical up down timings associated with the heat sealer. You should limit any changes in this programming screen as most values are factory set.
- Heat sealing: for the second sealing station working.
- Heat seal up/down: to control when the up/down cylinder working.
- Cup detected to heat seal: to set how many stations between the cup detector sensor to the second sealing station.
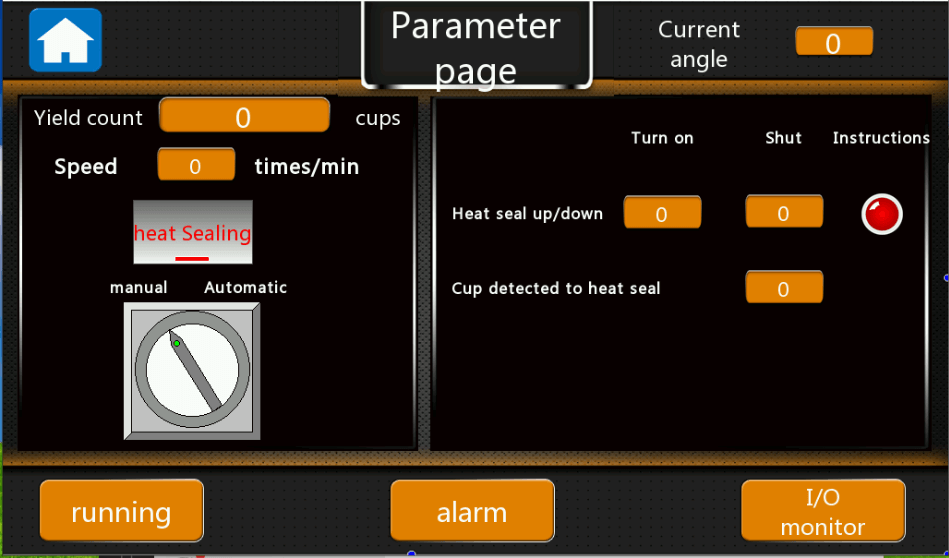
Figure 24 - Parameters setting for heat sealing
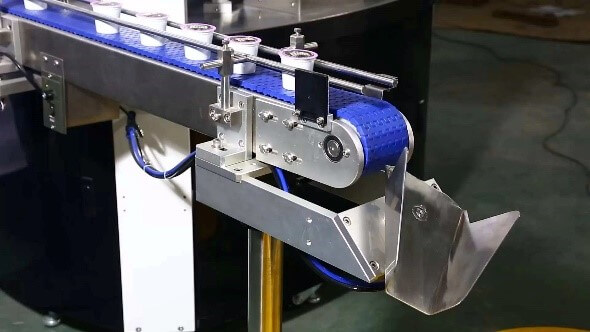
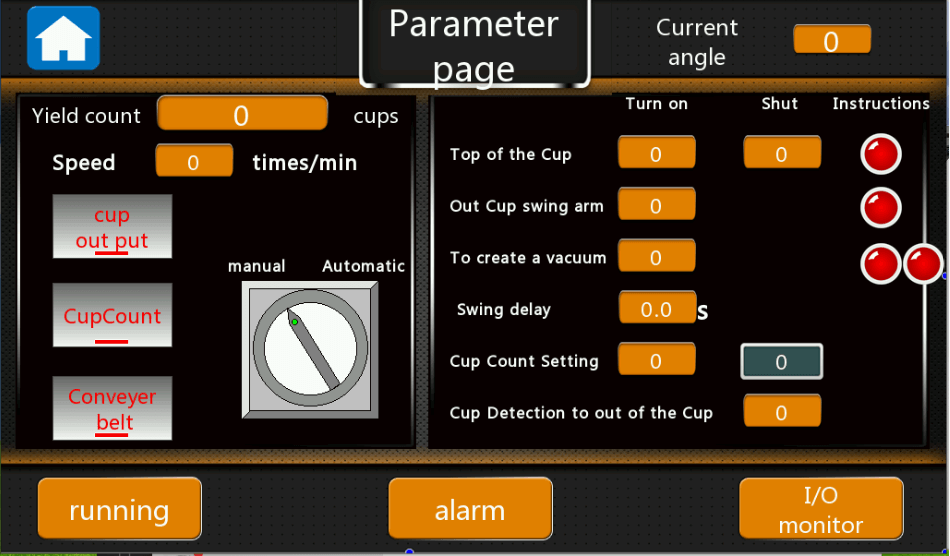
6.9 CUP OUTPUT
Enter the CUP OUTPUT programming menu by selecting the CUP OUTPUT indicator on the synoptic.
This programming menu will allow you to adjust the mechanical arm associated with the cup output. You should limit any changes in this programming screen as most values are factory set.
- Cup output: to control cups output.
- Cup count: to detector how many cups output and then flip over.
- Conveyor belt: to control the conveyor belt.
- Top of the cup: to control the cup up/down work/stop.
- Out cup swing arm: to control the swing arm work/stop time,
- To create a vacuum: to control when the cup suction vacuum will work.
- Swing delay: to control the delay time between twice working.
- Cup count setting: to set how many cups count and then swing to another side.
- Cup detection to out of the cup: to set how many stations between the cup detector sensor to the cup output station.
6.10 Alarms overview
Figure 26 - Alarm Screen

Figure 26 - Alarm Screen of coffee capsule filling sealing machine AFPAK Emergency stop: the machine is under the emergency stop now, Please turn the emergency stop button and press the red button below the touch screen to clear the alarm
- Insufficient silo, please feed: the powders inside the filling hopper is not enough, please feed more
- Hopper shortage alarm: the hopper is shortage, please feed more
- Mainframe failure: Variable frequency failure caused by voltage instability, confirm the input voltage to ensure the stability of the voltage;
- Cup output cylinder protection: something wrong with the cup output cylinder, please check
- Counting stop: the machine produced the quantity meet the set value on the screen, please reset the count value.
- Host location stuck: the host position is stuck, please check the main motor
- Drop cup cylinder protection: the drop cup up/down cylinder is stuck
- Film empty shutdown: the film is out of supply, please supply more.
- Low air pressure protection: the machine air pressure is less than 0.6MPA, please feed more air
- Cup bin without cup shutdown: please feed more capsules on the capsules bin
- Film cutting servo failure: please check the servo motor driver error code
- Security door protection: the doors are open, machine will not working
- Die stop with object: the rotary disc is stuck by something, please kindly check
- Broken film protection: the film is broken
- Fill 1 servo failure: Filling servo motor doesn’t work
- Laminated protection: something wrong with the push film cylinder
- Cut film heat seal protection: something wrong with the cut and seal station
- When have the alarm, please kindly check the position clearly, solve the errors, and then press the red “Stop” button below the screen, then the machine will run again.

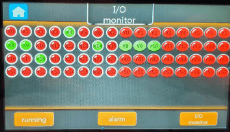
6.11 I/O MONITOR
7 Password
This is page to enter the parameters settings. Do not make any changes without conforming with the manufacturer. The passcode is 198888.
8 Key Contacts
Jeffree Cao
SHANGHAI AFPAK CO., LTD
Web: www.afpakmachine.com
WhatsApp: +86-15618866167
スカイプ: アレナンフ
電子メール: anf717@gmail.com info@anfpak.com
9 Regulatory Requirements
[Enter information describing regulatory and policies compliance requirements or provide a reference to where it is stored.]
10 Coffee capsule filling sealing machine Common issues and troubleshooting
In the process of operation, the improper operation and settings, and mechanical parts, electrical components damaged and other reasons, will cause the machine does not work, please first find the reason, from table following and take effective measures. If the problem still cannot be solved, please contact the supplier.


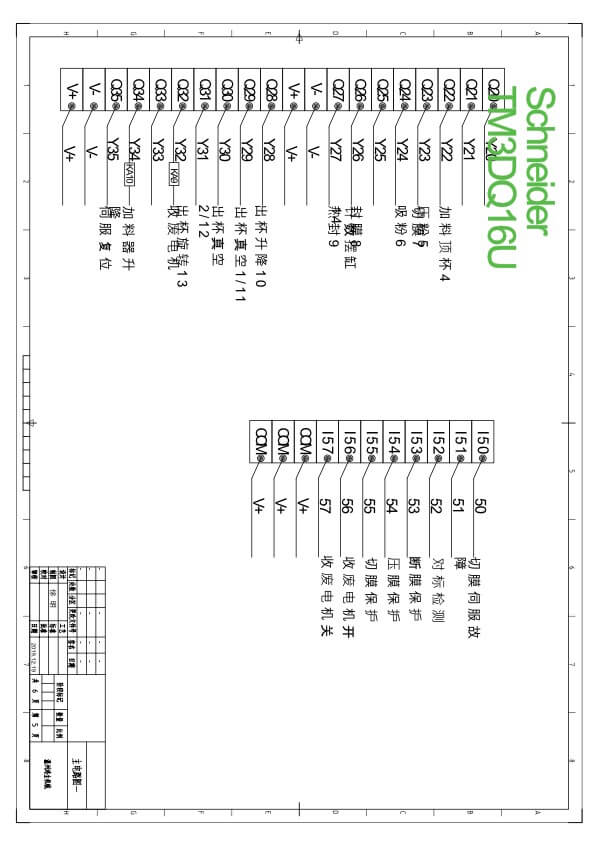
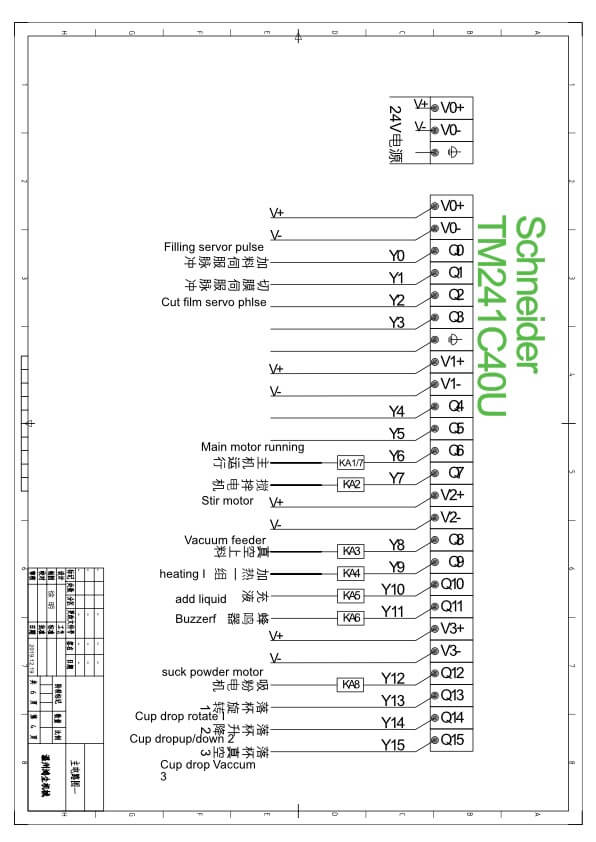
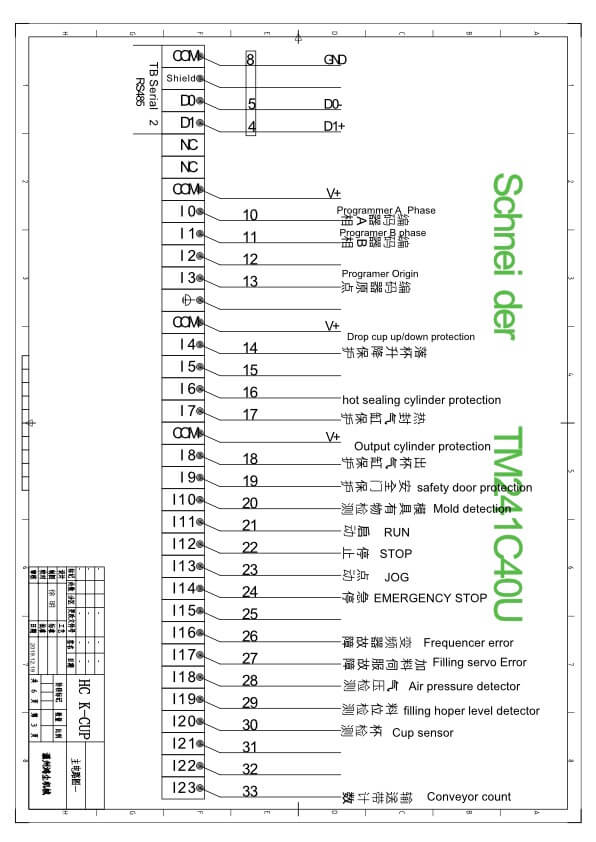
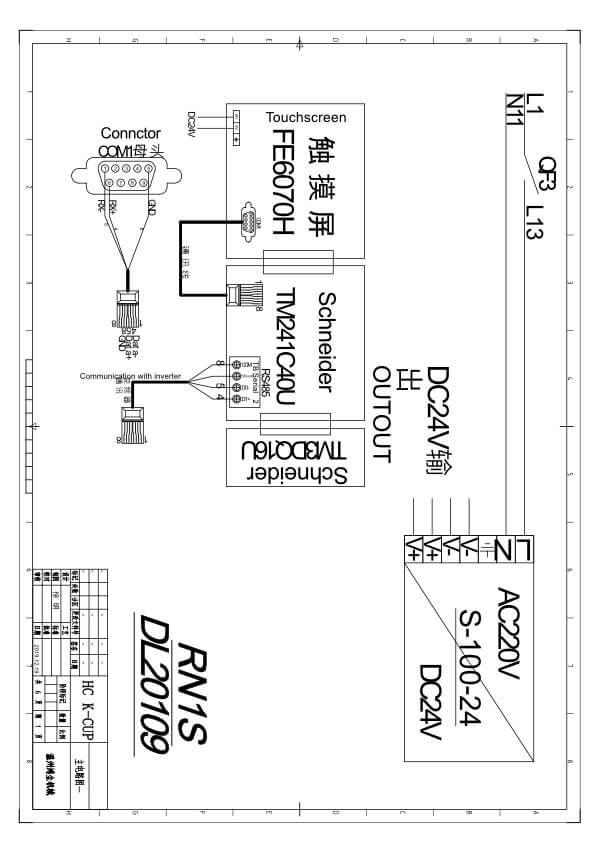
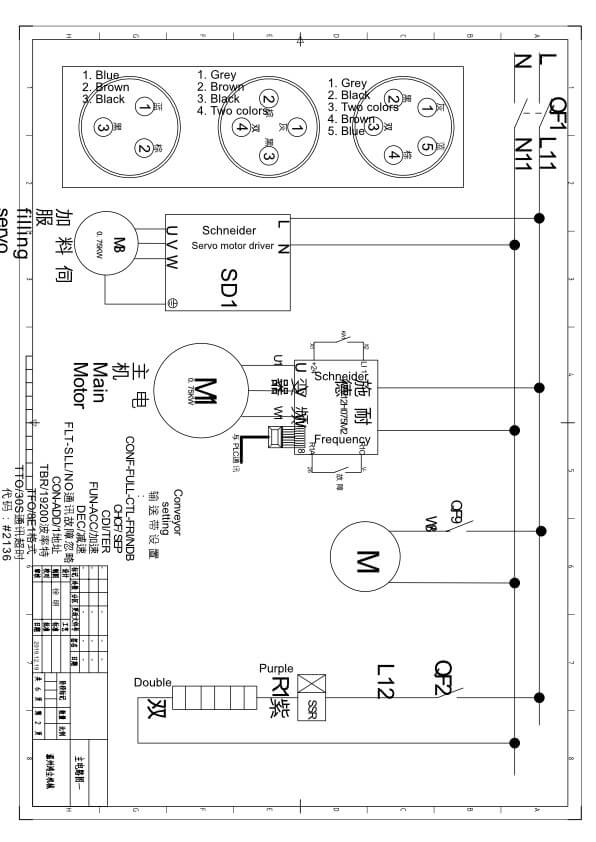
付録B:コーヒーカプセル充填シーリングマシンの電気図
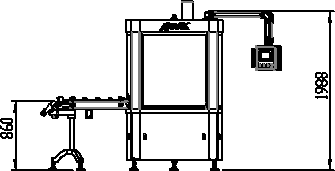
11 Machine technical parameters
Note: This machine can only package a certain specification capsule, if you change the capsules size, then need to change the mold plate.
| 説明 | パラメータ |
| Max filling powder weight | 8-15g |
| 包装速度 | 50-70 capsules/min |
| Coffee filling accuracy | ±0.2g |
| Laying-off station | 1 |
| Net weight of the machine | 750キロ |
| Machine case size | 1745mm(length)X1150mm(width) X2850mm(height) |
Figure 27 - Machine parameters
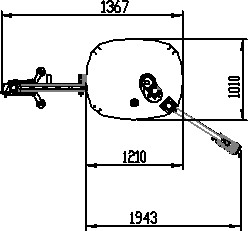
12 Machine Dimensions