ROTARY RN1S COFFEE CAPSULE FILLING SEALING MACHINE
Operations and Maintenance Manual
*This Manual can use for all RN1S Coffee Capsules Filling Sealing machines, no matter you are producing Nespresso, K cups, Lavazza, Dolce Gusto, etc, all can follow this machine. Thank you
TABLE OF CONTENTS
(From this page, you will see the following contents, and you can click on the content you need to jump to the detailed description)
1.3 Coffee capsule Filling Sealing Machine is dangerous. 5
2.5 Control Computer screen layouts and key functions. 8
3 Installation and preparing for the operation. 9
3.3 Compressed Air – Blue Regulator 9
3.4 Nitrogen – Red Regulator 9
3.7 Programming the dosage. 11
3.8 Setting the cup capsule counter 11
3.9 Counting the number of capsules at the end of the conveyor belt 11
4 Loading the ground coffee. 13
4.1 About the Ground Coffee loader. 13
4.2 Loading and Unloading the Ground Coffee. 13
4.3 Emptying the Ground Coffee Hopper 13
5 OPERATING the Coffee capsules filling sealing machine.. 15
5.2 Operating the machine in automatic mode. 15
5.3 Operating functions manually. 16
10 Common issues and troubleshooting. 27
APPENDIX B: Electrical Diagrams… 29
11 Machine technical parameters. 29
1 Introduction
1.1 Purpose
Before installing the machine, please read this manual carefully, to avoid personal injury and/or damage the machine.
Please familiarize yourself with the machine, the connections, emergency stop procedure before attempting to operate.
1.2 Audience
This manual is intended to assist in training basic operation and programming of the machine. Machine operations should only be attempted by trained staff under technical supervision.
1.3 Packaging machines are dangerous.
Packaging operations require moving arms and leverage points, high voltage, high pressure gasses which all could cause serious harm.
- It is essential that all personnel operating the machine have been trained correctly and adhere to the safety rules in this manual.
- Please do not remove any safety guards or turn off the door alarm as this could be dangerous and potentially cause serious harm to the operator.
- The operators must be physically and intellectually suitable to carry out their job. They are the only persons allowed to approach the machine and they are compelled to carry out the pre-fixed tasks only, for which they have been duly trained.
- Only authorized technical staff may perform maintenance on the machine.
- No unauthorized personnel are allowed neat the machine whilst it is operating.
- Never leave the machine unattended whilst it is operating.
- Only qualified personnel should OPERATE, MAINTAIN, and REPAIR THE MACHINE
- STOP using the machine if a breakdown occurs and have it repaired immediately.
- The electric board door must be always closed.
- While machine working, pay attention to unusual noises. If you hear something unusual, stop the machine and investigate immediately.
1.4 Security door
For safety reasons the door should not be opened when the machine is running. There are proximity switches at the access doors to the machine, when the door is open, this will automatically stop the machine, sound the alarm, and start the strobe light flashing.
CAUTION SAFETY HAZARD: For experienced operators and maintenance staff there may be a need to open the door and have the machine running. In this case you can disable the safety door function from the touch screen.
1.5 Emergency Stop
In an emergency, you can press the red “stop” button on the machine, the machine will stop running immediately. After troubleshooting, then you can reset the button. Turn it right to reset.[/vc_column_text][/vc_column][/vc_row][vc_row][vc_column][vc_column_text]
2 System Description
2.1 Key Features
The ROTARY RN1S COFFEE CAPSULE FILLING AND SEALING MACHINE is a fully enclosed automated capsule filling machine that can operate up to 70 capsules per minute.

Figure 1 – Specifications
2.2 Operation Environment
This machine is designed to run at room temperature in an indoor environment.
The machine is fitted with casters allowing it to be moved on a flat surface. Please remove all connections and secure swinging arm before moving.
The temperature of heat-sealing device is extremely high when the machine is operating. If you need to make any adjustments to the machine or perform any maintenance functions in the vicinity of the heating elements, switch off the machine and allow it to cool down first.
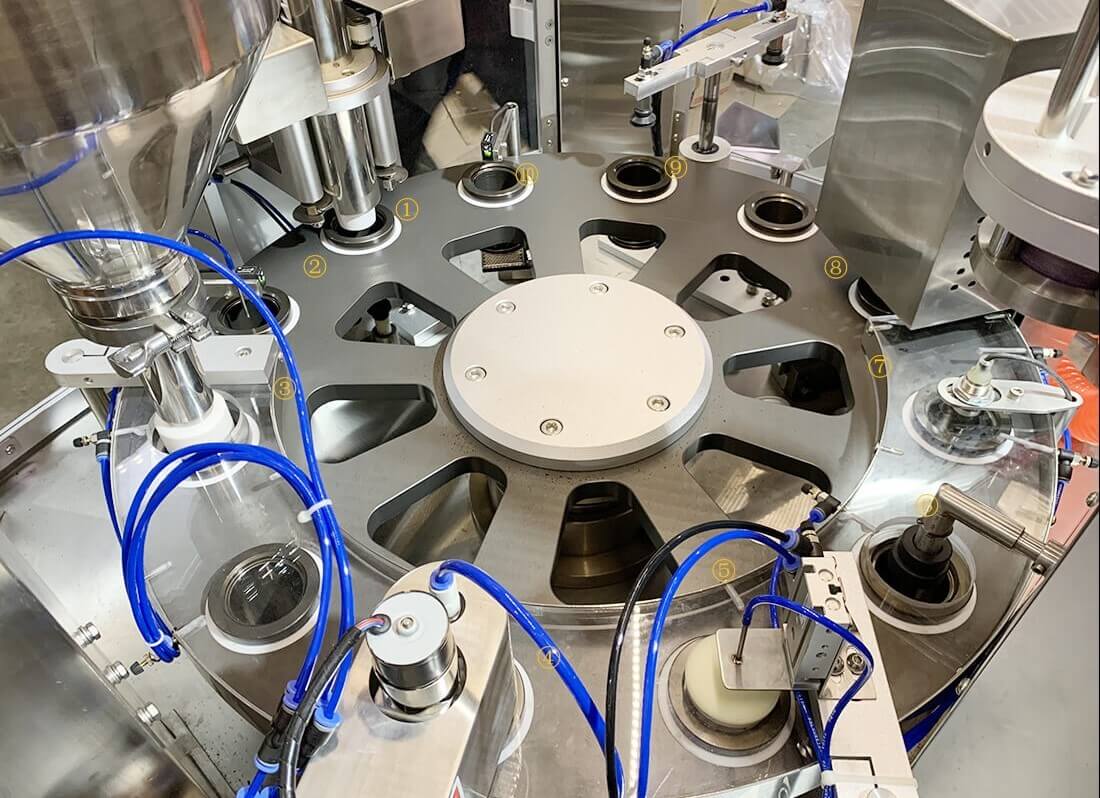
2.3 Machine overview
Before installing the machine, please read this manual carefully, to avoid personal injury and/or damage the machine.
Please familiarize yourself with the machine, the connections, emergency stop procedure before attempting to operate.
- Vertical capsule dropper
- Cup sensor, if cup holder is empty the machine will not fill that slot.
- Ground coffee filler by a servo-controlled auger.
- Edge cleaning.
- Nitrogen Filling tubes (blue tubes in diagram)
- Cut and place paper lids on.
- Lid sensor.
- Lid sealing
- Capsule output
- Capsule sensor, typically if lid has not been placed correctly the capsule will not be lifted by the lifting arm. The coffee capsule filling sealing machine will stop.
2.4 Machine Passcode
WARNING: ONLY experiences users should enter the programming mode.
2.5 Control Computer screen layouts and key functions

All key functions are controlled through the control panel. Most elements will be pre-programmed from the factory, please do not change settings before recording the factory default settings.
- Main touch screen
- Manual Operation
- Auto Operation
- Stop
- Emergency Stop
- Second heat seal
Controlling each function is quite simple, there are 2 modes of operation. AUTOMATIC and MANUAL. In most cases the machine will operate in the AUTOMATIC MODE.
Press AUTOMATIC on the control panel and then press AUTO button C – START.
The machine will operate automatically for all functions.
In cases where you wish to control a specific function, leave the machine in MANUAL MODE, select the desired function on the control panel and then press AUTO button C – to start.[/vc_column_text][/vc_column][/vc_row][vc_row][vc_column][vc_column_text]
3 Installation and preparing for Coffee capsule Filling Sealing Machine operation
Follow the following procedure.
3.1 Power – 240 Volt 50 Hz
Connect the supplied power cable to a 240 V 50 Hz 10 AMP outlet.
After connecting the power cable. Turn on the machine using the on/off switch.
3.2 Set Temperatures
Temperatures for the two sealing units are set by the two control meters on the control panel. The top meter (Meter G) sets the temperature of the cutter and the first sealing unit.
The bottom meter (Meter F) sets the temperature of the second sealing unit.
To set the temperature press the up / down buttons until the desired temperature is reached. This value will be displayed in GREEN.
The unit will heat up and the actual temperature will be displayed. Once the actual temperature is reached for both temperature gauges you may begin making capsules.
3.3 Compressed Air – Blue Regulator
Connect compressed air to the following inlet using the connections provided or new connectors as required.
B – On/off switch, push in to switch air supply on, pull out to turn air supply.
To adjust air pressure, pull out A to deliver an air pressure to the unit of between 0.6 bar-0.8 bar as shown in meter C.
After any adjustments make sure that C is pressed back down in the locked position.

3.4 Nitrogen – Red Regulator
Coffee is a delicate product. To prevent the oxidation of the coffee in portion packs, nitrogen gas is used during dosing until the capsules are sealed and the oxygen is removed.
The Nitrogen flushing is handled automatically by the capsule packing machine. The only requirements are to connect a bottle of food grade nitrogen to the machine.
To adjust air pressure, pull out D to deliver an air pressure to the unit of between 0.1 MPA as shown in meter E.
The nitrogen gas pressure should be 0.1MPA with a flow rate of between we recommend 200-500 liters/MIN.
Use food-grade Nitrogen.
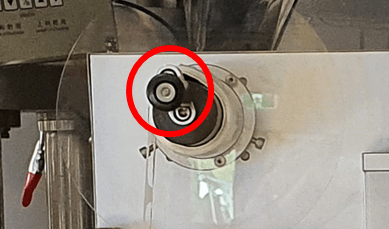
3.5 Load Capsules
Load empty capsules through the capsule tube.
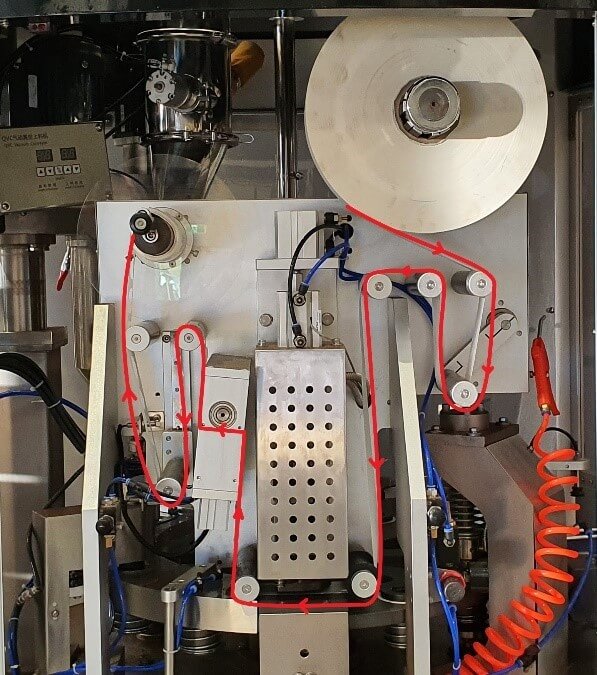
3.6 Load paper real
Load the paper real by following the steps below.
3.7 Programming the dosage
Set the desired weight of the capsule, in this example we will is 5.5g. To calibrate this weight, you will then need to adjust the FEEDING SUBDIVISION values. The Larger the value, the lower filling quantity, the smaller value, the greater filling quantity. A good starting point is 1.34.
| Function | Description |
| Filling Serve Turn on 100 Shut 200 – this is to control the filling servo on and off time | NO NEED TO ADJUST THIS VALUE – FACTORY SET |
| Topping device Turn on Shut 300 – This is the capsules lift and down time. | NO NEED TO ADJUST THIS VALUE – FACTORY SET |
| Stirring time 1.0 s This is the delay time to the next stirring cycle when stirring is not set to continuous mode. | NO NEED TO ADJUST THIS VALUE – FACTORY SET |
| Cup testing to topping 0 – no cup no filling | NO NEED TO ADJUST THIS VALUE – FACTORY SET |
| Weight added 5.5 g – You can set this value to the filling weight you want to get | Adjust this value for the desired output weight |
| Filling Serve Turn on 100 Shut 200 -this is to control the filling servo on and off time from Programmer value | NO NEED TO ADJUST THIS VALUE – FACTORY SET |
| Feeding Subdivision: This is to adjust the filling accuracy, if the measured weight does not meet the set value (Weight added 5.5 g), you can calibrate with this value. Adjust the feeding subdivision: The Larger the value, the lower filling quantity, The smaller value, the greater filling quantity | Adjust this value to calibrate. A good starting point is 1.34 |
| SERVO speed No need to change normally, this is the servo motor running speed. | NO NEED TO ADJUST THIS VALUE – FACTORY SET |
| SERVO Acceleration. This is to adjust the servo motor acceleration, The lower the value the faster the speed. | NO NEED TO ADJUST THIS VALUE – FACTORY SET |
| Servo Deceleration: To adjust the servo motor stop, the larger the value the longer it will take to stop. | NO NEED TO ADJUST THIS VALUE – FACTORY SET |
| SERVO. This is the servo motor running speed. | NO NEED TO ADJUST THIS VALUE – FACTORY SET |
| Filling times after less material | NO NEED TO ADJUST THIS VALUE – FACTORY SET |
Figure 8 – programming of dosage
3.8 Setting the cup capsule counter
You can program the machine to set up a predefined number of capsules. Once the machine reaches the programmed amount of capsules the machine will automatically stop and an alarm with sound.
To set the programmed quantity:
Select COUNTING STOP and enter desired number of capsules
Activate CUPCOUNT
Machine will automatically stop after the programmed amount of cups
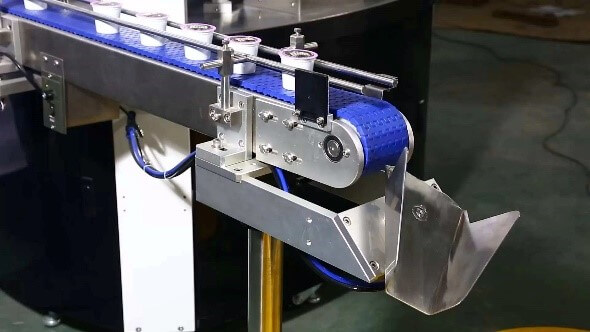
3.9 Counting the number of capsules at the end of the conveyor belt
You can program the machine to set up a predefined number of capsules at the end of the conveyor belt before the chute changes position.
Once the machine reaches the programmed number of capsules the chute will change positions. This allows the counting of capsules per carton before packing.
To set the programmed quantity.
4 Loading the ground coffee
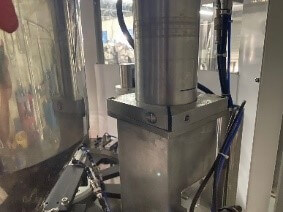
4.1 About the Ground Coffee loader.
The ground coffee loader will automatically load the auger with ground coffee.
Please check the connections prior to operating.
- Air Supply
- Electrical line connection
- Tube for ground coffee

4.2 Loading and Unloading the Ground Coffee
- Clean the Filter.
- Switch Machine to “AUTOMATIC”
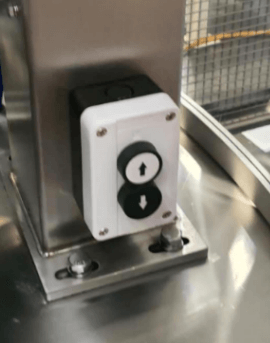
- Press the ON/OFF button on the vacuum feeder box to keep the vacuum feeder ON. NOTE: This needs to be done every time you turn on the machine. The filler will work automatically as the hopper needs filling.
- After turning ON the feeder, there is a sensor on the filling hopper to check and control the vacuum feeder/conveyor.

4.3 Emptying the Ground Coffee Hopper
Please do not leave ground coffee in the hopper. It should be packed in capsules or removed once you have finished packing for the day.
To empty the Hopper and the auger please follow the instructions below.
- Loosen the screw below the Auger.
- On control panel, Switch to MANUAL
- Select FILLING and STIR on the touchscreen
- Use buttons to lift the Auger, swing out and empty coffee.
- Once you have aligned the hopper away from the machine and have a container under the spout,
- Turn off FILLING
- Active the EMPTY HOPPER and STIR
- Once the AUGUR is empty – Turn off EMPTY HOPPER and STIR
- To reverse the process and put the machine back to normal operational mode.
- Use button to move Augur down.
- Tighten the screw to lock into position.
5 OPERATING the MACHINE
5.1 Language selection
Figure 15 – Language select
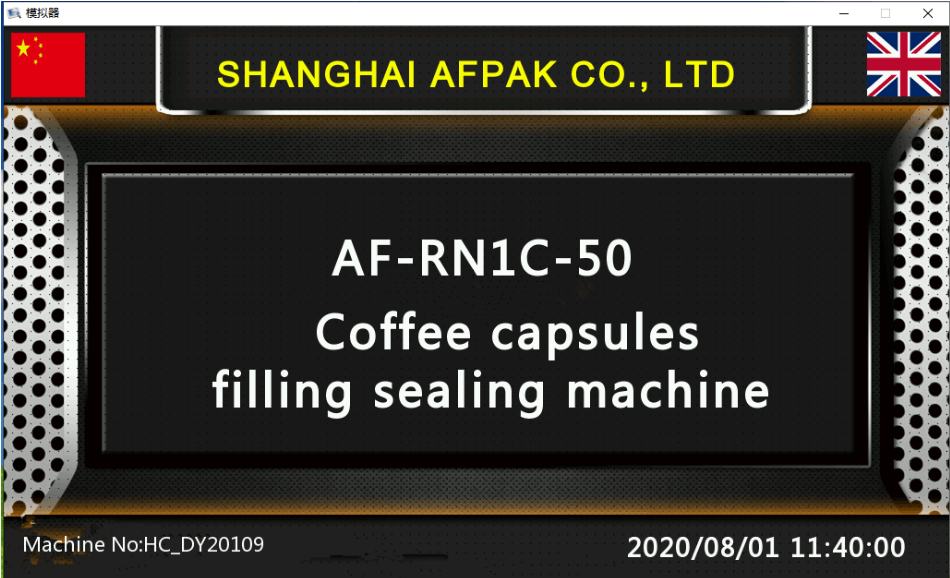
Press (hold 3 seconds) the Chinese flag, change to Chinese language on the control panel.
Press (hold 3 seconds) the U.K. flag, change to English language on the control panel.
5.2 Operating the machine in automatic mode
The machine will normally operate in the AUTOMATIC mode without any need for the operator to adjust any parameters.
- It is important that the machine is clear from all capsules before starting the machine.
- Turn on machine and wait until it reaches temperature on the front Control Panels
- Make sure that Air Pressure is correct.
- Open the Nitrogen infusion.
- Turn on the Vacuum Feeder
- Load Ground coffee
- Load empty capsules into the capsule hopper
- Place the machine into AUTOMATIC MODE
- Press the GREEN button ‘C’ AUTOMATIC on the control panel
- Press the RED button ‘D’ to stop the machine at any time.
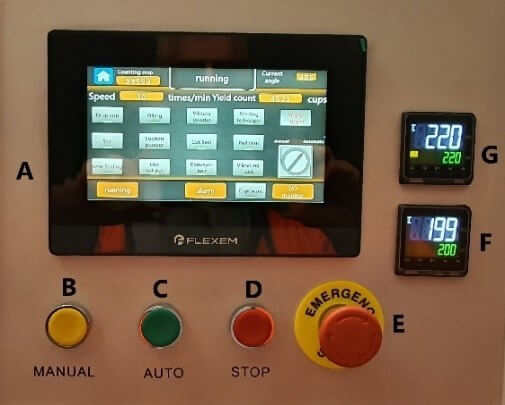
Figure 16 – Control buttons on panel

Figure 17 – Main machine synoptic
5.3 Operating functions manually
It is possible to operate individual or multiple elements manually for the purposes of testing or cleaning.
Select a function from the control panel.
- Example select CONVEYER BELT
- Press the GREEN ‘C’ Button AUTOMATIC on the control panel to start
- Press the RED ‘D’ Button to stop the machine at any time.
- Example select PULL FILM
- Press the GREEN ‘C’ Button AUTOMATIC on the control panel to start
- Press the RED ‘D’ Button to stop the machine at any time.
6 Programming mode
6.1 MACHINE Synoptic
This is page to enter the parameters settings. Do not make any changes without conforming with the manufacturer. The passcode is 198888.
6.2 Auto running page
This is page to enter the parameters settings. Do not make any changes without conforming with the manufacturer. The passcode is 198888.

Figure 18 – Machine Synoptic
The machine Synoptic chart shows the main operational elements of the machine. When the machine is in MANUAL MODE, selecting one of the key functions will take you to the programming functions for that part of the process.
Key programming functions:
- DROP CUP
- FILLING
- SUCTION POWDER
- CUT SEAL
- HEAT SEALING
- CUP OUTPUT – parameters set to protect the cylinder when machine is stop
- Heating – is to turn on the heating No. 5 and No.6. Press to turn ON/OFF
- Current angle: the rotary disc position now when running (set in the machine programmer)
- Stopping Position: the rotary disc running time (set in the machine programmer)
- Home page: press to back to home page
- Short cut to the running screen
- Short cut to the alarm screen
- Short cut to the I/O monitor screen
6.3 RUNNING
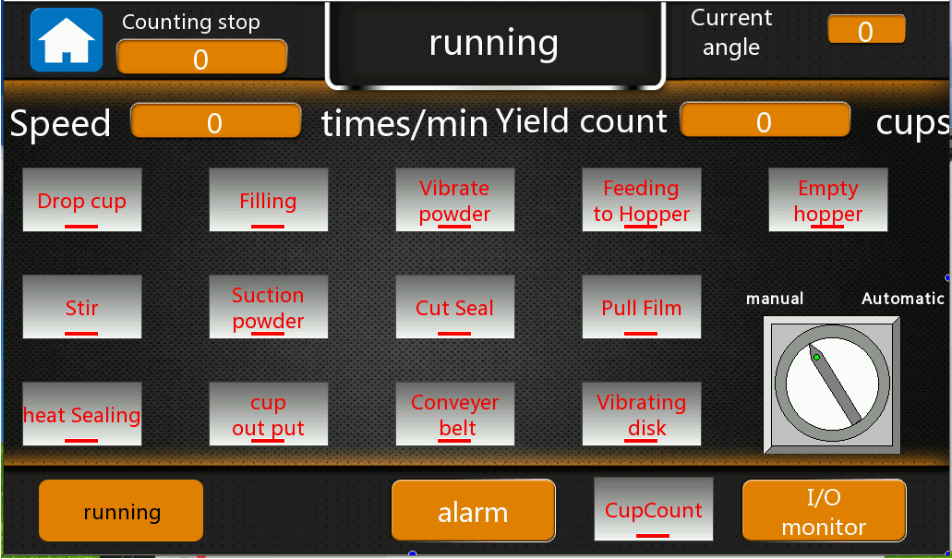
Figure 19 – Main running screen
This is the main screen that is used to operate the machine. Place the machine in Automatic and then press Button C (green button) to run the machine. Refer 8 Operating the machine.
- Drop cup: to control the drop cup
- Filling: to control the filling station
- Vibrate powder: to control the filling vibration
- Feeding to hopper: To control the vacuum feeder
- Empty Hopper: the function to clean the hopper
- Stir: to control the stir motor
- Suction powder: to control the capsules edge cleaning station
- Cut seal: to control the cut and seal station
- Pull film: to control the pull film motor
- Heat sealing: to control the second sealing station
- Cup output: to control the cup output
- Conveyor belt: control the belt running
- Vibrating disk: to control the vibrating capsules feeding system (optional function
- Cup count: to control the cup counting function
- Manual/Automatic: If Manual mode, all functions are not working, you need to press the one you want to working, then press the green button under the screen to test this function; If auto mode, all functions will work
6.4 DROP CUP
The drop cup programming screen is entered by touching on DROPPED CUP on the synopsis.
Manual operations include:
- Drop Cup. press to run this function in Manual module. only press the button, then the function will operate. In Auto module, all the functions will operate.
Programming functions.
- Yield count: to count how many capsules have been produced.
- Speed: the machine running speed.
- Manual/Automatic: switch to auto running or manual running of the machine.
- Drop Cylinder: set the parameters to control the drop cup cylinder when to work and stop
- Cup drop up/down: set the parameters to control the cup up/down cylinder when to work and stop
- Cup drop vacuum: set the parameters to control the drop cup vacuum suction when to work and stop
- Cup test: is the sensor parameters to detector when to work/stop
- Number of cups drops after cup absence: set to value to stop the machine after how many capsules absence in the rotary disc
- Instructions: is the function working signal
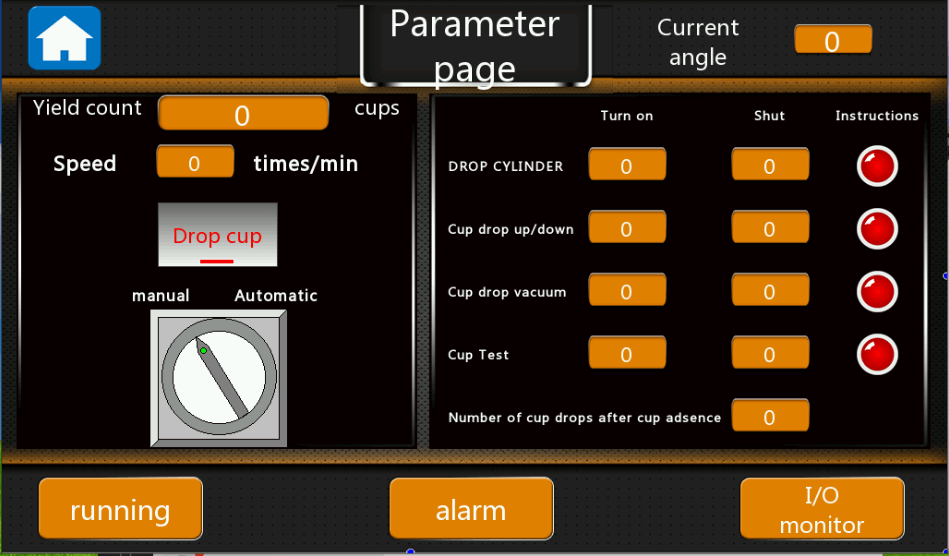
Figure 20 – Drop cup Parameter Page
6.5 FILLING
Enter the filling programming menu by selecting the filling indicator on the synoptic. This programming menu will allow you to adjust key ground coffee filling values for the machine. You should limit any changes in this programming screen as most values are factory set.
Typically, you will only need to adjust the Weight added field.
Calibration is done through the Feeding Subdivision field.
- Filling Servo.
- Topping device.
- Stirring time.
- Cup testing to topping.
- Weight added 5.5 g – You can set this value to the filling weight you want to obtain.
- Filling Serve.
- Feeding Subdivision. This is to adjust the filling accuracy, if the measured weight does not meet the set value (Weight added 5.5 g), you can calibrate with this value.
- SERVO speed.
- SERVO Acceleration. This is to adjust the servo motor acceleration, The lower the value the faster the speed.
- Servo Deceleration. To adjust the servo motor stop, the larger the value the longer it will take to stop.
- Filling times after less material.

Figure 21 – Capsule filling Parameter Page
6.6 VIBRATE POWDER
- Suction powder: to clean the powder on the capsules edge for better sealing
- Manual/automatic: in Manual module, only press the button, then the function will work. In Auto module, all the functions will work.
- Tamp Cylinder: to control when the tamp cylinder will work/ stop
- Vacuum suction: to control when the vacuum suction will work/ stop
- Powder detected to sucking: to set how many stations between the cup detector sensor to the suction powder station.
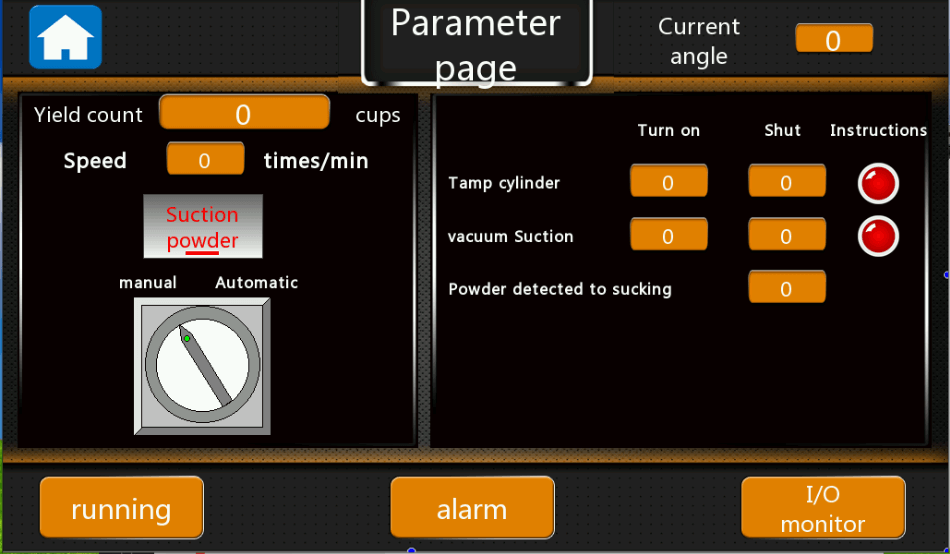
Figure 22 – Parameters page for suction powder
6.7 CUT SEAL
Enter the CUT SEAL programming menu by selecting the CUT SEAL indicator on the synoptic. This programming menu will allow you to adjust film real parameters for the machine. You should limit any changes in this programming screen as most values are factory set.
- Cut seal: to control the cut and seal cylinder.
- Put film: to control the pull film cylinder.
- Manual/auto: in Manual module, only press the button, then the function will work. In Auto module, all the functions will work.
- Manual punctuation: this is for the film with eye mark, press this button, and then the film will auto running and stop at the eye mark detected by the sensor.
- Calibration: is to control the machine to pull the film to the set length.
- Cutting cylinder: to control when the cutting cylinder work/stop,
- Film cutting heat seal: to control when the heat seal work/stop.
- Film drawing servo: to control when film pull servo work/stop.
- Cup test to cut the membrane: to set how many stations between the cup detector sensor to the film cutting station.
- Cup test to pull film: to set how many stations between the cup detector sensor to the pull film station.
- Pull speed: to control the film pull speed.
- Film accelerate: to control the servo motor when to accelerate to pull film more.
- Film Deceleration: to control the servo motor when to decelerate to pull film slowly.
- Film length I: to set the first step to pull how many films pull at one time.
- Film length II: to set the second step to pull how many films ay one time.
- Pull film compensation: to adjust the pull film accuracy.
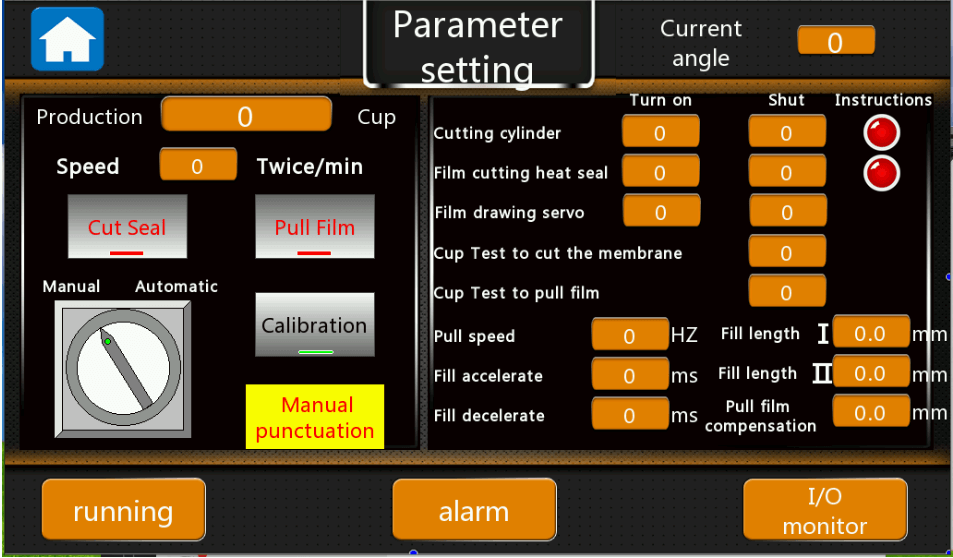
Figure 23 – Parameters page to seal and cut film
6.8 HEAT SEALING
Enter the HEAT SEALING programming menu by selecting the HEAT SEALING indicator on the synoptic. This programming menu will allow you to adjust the mechanical up down timings associated with the heat sealer. You should limit any changes in this programming screen as most values are factory set.
- Heat sealing: for the second sealing station working.
- Heat seal up/down: to control when the up/down cylinder working.
- Cup detected to heat seal: to set how many stations between the cup detector sensor to the second sealing station.
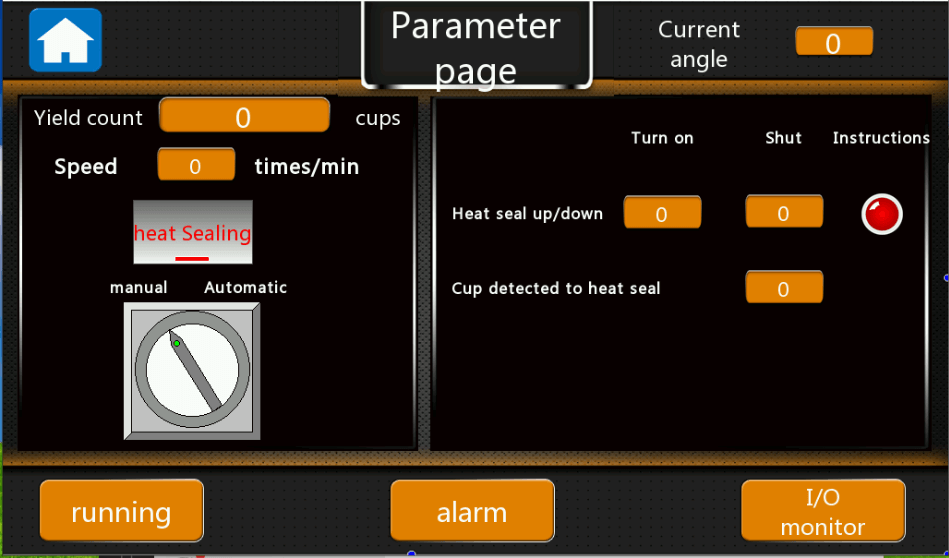
Figure 24 – Parameters setting for heat sealing
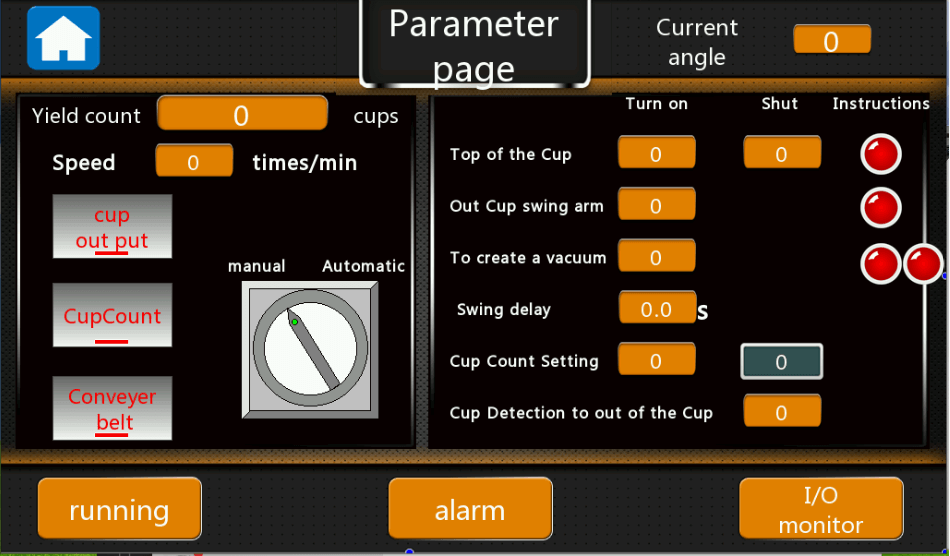
6.9 CUP OUTPUT
Enter the CUP OUTPUT programming menu by selecting the CUP OUTPUT indicator on the synoptic.
This programming menu will allow you to adjust the mechanical arm associated with the cup output. You should limit any changes in this programming screen as most values are factory set.
- Cup output: to control cups output.
- Cup count: to detector how many cups output and then flip over.
- Conveyor belt: to control the conveyor belt.
- Top of the cup: to control the cup up/down work/stop.
- Out cup swing arm: to control the swing arm work/stop time,
- To create a vacuum: to control when the cup suction vacuum will work.
- Swing delay: to control the delay time between twice working.
- Cup count setting: to set how many cups count and then swing to another side.
- Cup detection to out of the cup: to set how many stations between the cup detector sensor to the cup output station.
6.10 Alarms overview
Figure 26 – Alarm Screen

Figure 26 – Alarm Screen of coffee capsule filling sealing machine AFPAK Emergency stop: the machine is under the emergency stop now, Please turn the emergency stop button and press the red button below the touch screen to clear the alarm
- Insufficient silo, please feed: the powders inside the filling hopper is not enough, please feed more
- Hopper shortage alarm: the hopper is shortage, please feed more
- Mainframe failure: Variable frequency failure caused by voltage instability, confirm the input voltage to ensure the stability of the voltage;
- Cup output cylinder protection: something wrong with the cup output cylinder, please check
- Counting stop: the machine produced the quantity meet the set value on the screen, please reset the count value.
- Host location stuck: the host position is stuck, please check the main motor
- Drop cup cylinder protection: the drop cup up/down cylinder is stuck
- Film empty shutdown: the film is out of supply, please supply more.
- Low air pressure protection: the machine air pressure is less than 0.6MPA, please feed more air
- Cup bin without cup shutdown: please feed more capsules on the capsules bin
- Film cutting servo failure: please check the servo motor driver error code
- Security door protection: the doors are open, machine will not working
- Die stop with object: the rotary disc is stuck by something, please kindly check
- Broken film protection: the film is broken
- Fill 1 servo failure: Filling servo motor doesn’t work
- Laminated protection: something wrong with the push film cylinder
- Cut film heat seal protection: something wrong with the cut and seal station
- When have the alarm, please kindly check the position clearly, solve the errors, and then press the red “Stop” button below the screen, then the machine will run again.
6.11 I/O MONITOR
7 Password
This is page to enter the parameters settings. Do not make any changes without conforming with the manufacturer. The passcode is 198888.
8 Key Contacts
Jeffree Cao
SHANGHAI AFPAK CO., LTD
Web: www.afpakmachine.com
WhatsApp: +86-15618866167
Skype: allenanf
Email: anf717@gmail.com info@anfpak.com
9 Regulatory Requirements
[Enter information describing regulatory and policies compliance requirements or provide a reference to where it is stored.]
10 Coffee capsule filling sealing machine Common issues and troubleshooting
In the process of operation, the improper operation and settings, and mechanical parts, electrical components damaged and other reasons, will cause the machine does not work, please first find the reason, from table following and take effective measures. If the problem still cannot be solved, please contact the supplier.


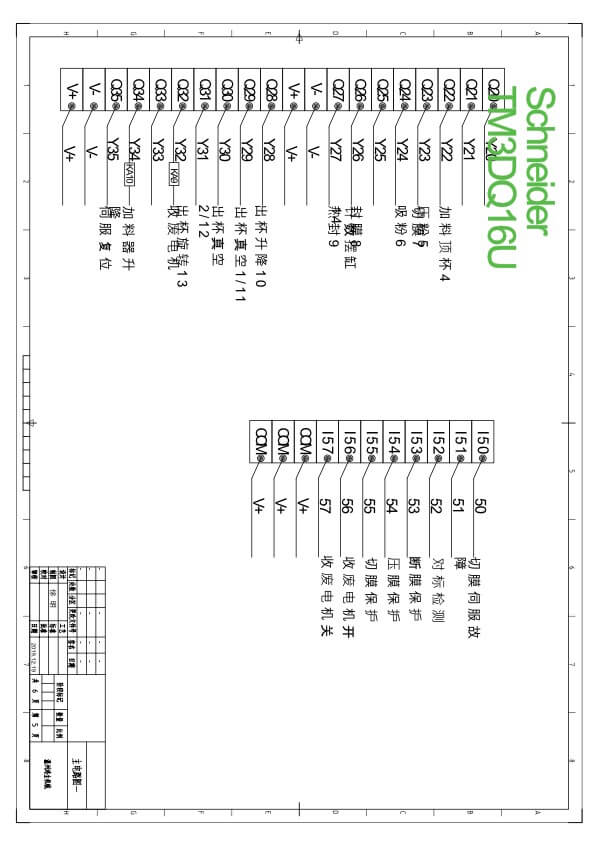
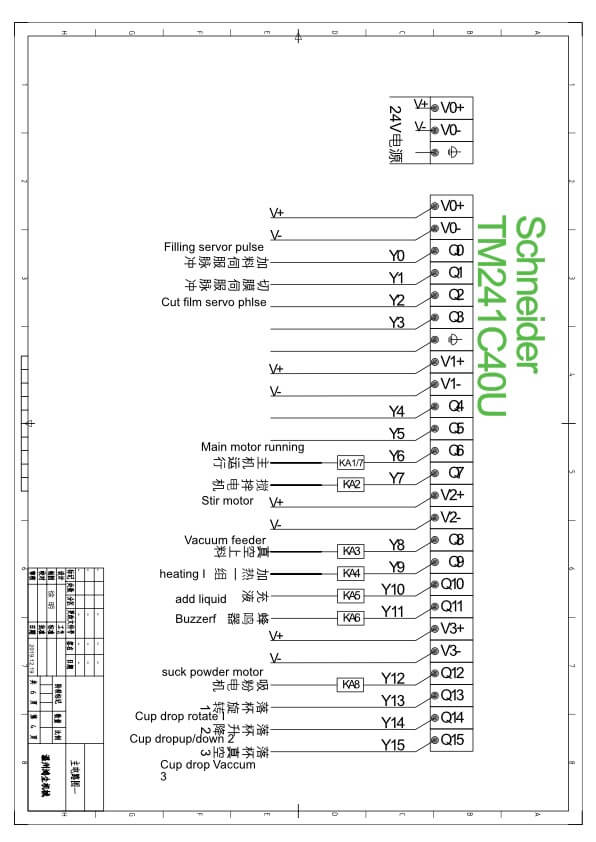
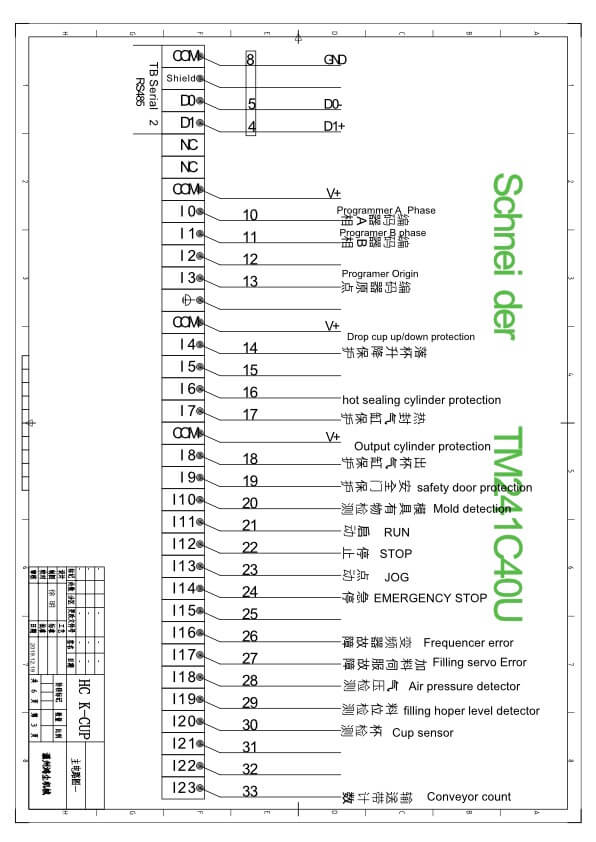
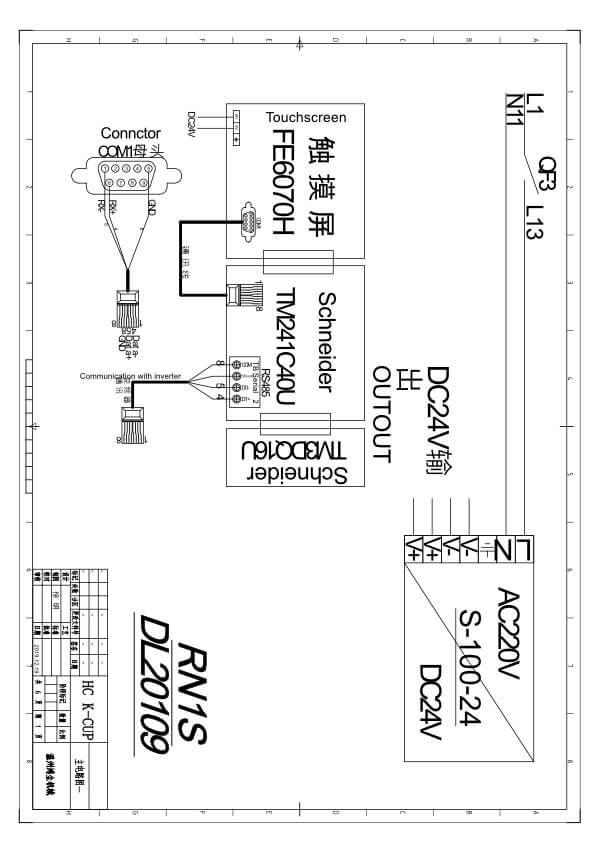
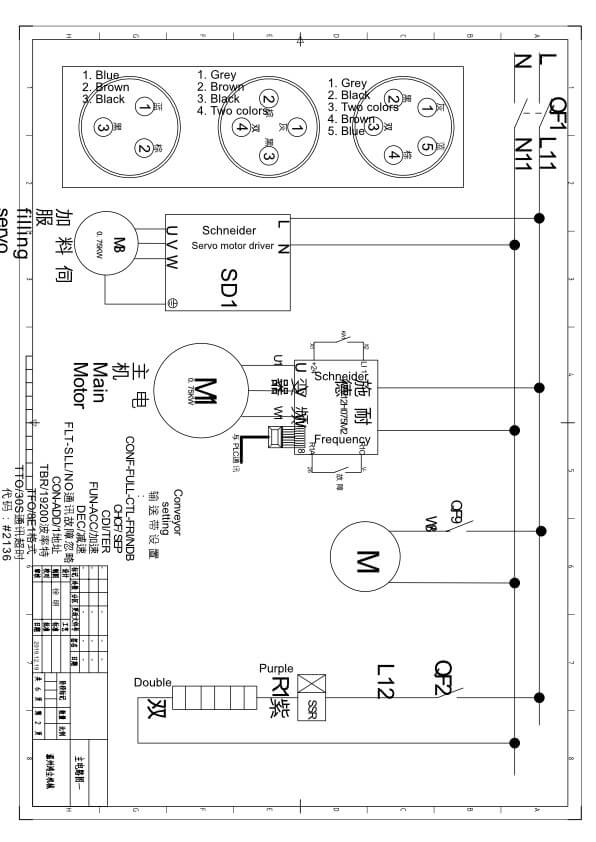
APPENDIX B: Electrical Diagrams of Coffee capsule Filling Sealing Machine
11 Machine technical parameters
Note: This machine can only package a certain specification capsule, if you change the capsules size, then need to change the mold plate.
| Description | Parameter |
| Max filling powder weight | 8-15g |
| Packaging speed | 50-70 capsules/min |
| Coffee filling accuracy | ±0.2g |
| Laying-off station | 1 |
| Net weight of the machine | 750Kg |
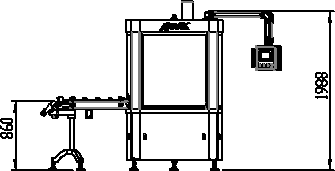
| Machine case size | 1745mm(length)X1150mm(width) X2850mm(height) |
Figure 27 – Machine parameters
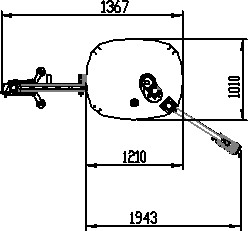
12 Machine Dimensions